
| wiki | search |
Overview
This tutorial describes how to use the Ridom SeqSphere+ software to define a custom MLST+ task template for analyzing next-gen sequencing data.
Neisseria meningitidis with reference strain MC38 is used exemplarily for this demonstration. However, by reading this tutorial you should be able to define your own Projects for other species and strains.
To find suited query genomes for an organism, visit GenBank and use a search term like the following:
"Neisseria meningitidis"[TITLE] AND "complete genome"[TITLE] NOT plasmid[TITLE] AND srcdb_refseq[prop]
At the time this tutorial was written this resulted in 14 hits:
NC_003112.2 (used as reference genome)
NC_017514.1
NC_017518.1
NC_017517.1
NC_017516.1
NC_017515.1
NC_017513.1
NC_017512.1
NC_017505.1
NC_017501.1
NC_013016.1
NC_010120.1
NC_008767.1
NC_003116.1
Preliminaries
This tutorial requires a running SeqSphere+ client and server.
If not done yet: Download and install the SeqSphere+ client and server software on your computer. Start the SeqSphere+ server, then start the SeqSphere+ client and initialize the database. For evaluation purpose a free evaluation license can be requested.
Running the MLST+ Target Definer
- Step 1: First launch the SeqSphere+ client and connect to your SeqSphere+ Server.
- Step 2: Choose Tools | MLST+ Target Definer from the menu bar. The MLST+ Target Definer window opens. There are sections for input sequences: Reference Genome and Query Genomes.
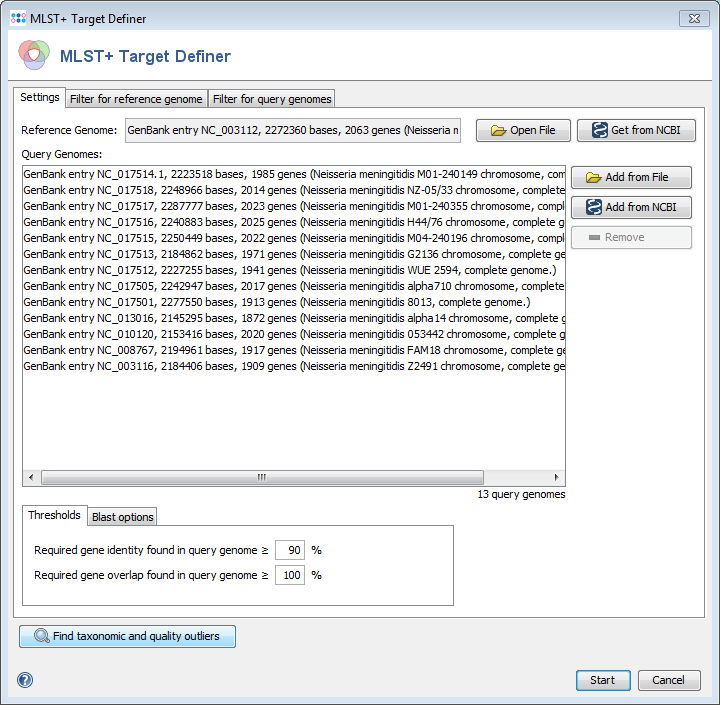
- Step 3: Press
 Get from NCBI in the Reference Genome section and enter the NCBI accession number NC_003112 (strain MC38). Press OK to download the genome and set it as reference genome.
- Step 4: Press Get from NCBI in the Query Genomes section and enter the list of NCBI accession numbers
NC_017514, NC_017518, NC_017517, NC_017516, NC_017515, NC_017513, NC_017512, NC_017505, NC_017501, NC_013016, NC_010120, NC_008767, NC_003116
Press OK to download all thirteen genomes and add them as query genomes.
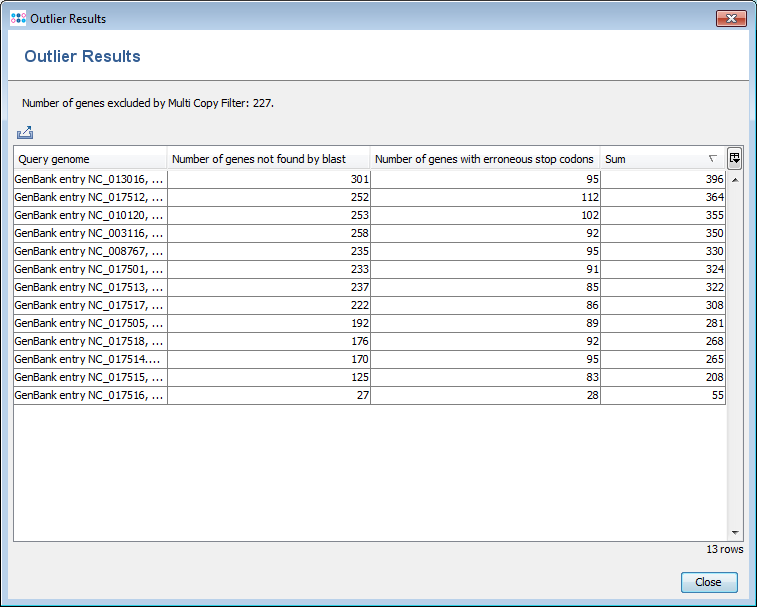
- Step 5: Press Find taxonomic and quality outliers to see if one of the query genomes is a subspecies that is very different from the reference or has quality problems (many stop codons). The upcoming window shows no extreme outlier in the Sum column. This indicates that no outliers are found for the query genomes.
- Step 6: There are several parameters and filters that can configured in the MLST+ Target Definer (see detailed description). For this tutorial and for most applications they should be left to default. Press Start to run the MLST+ Target Definer.
- Step 7: After a few minutes the process is finished and the results are shown.
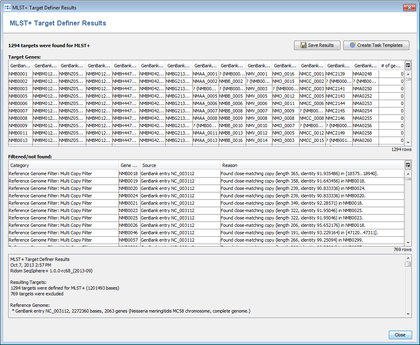
- The text on the bottom shows the overview of MLST+ Target Definer run. In this tutorial example 1294 genes were finally found:
- First 1777 non pseudo or paralogous genes were detected from the originally 2063 genes of the reference genome.
- Then those 1777 genes were reduced to 1294 genes that were found in all thirteen query genomes.

- Step 8: Optionally the results can be exported to files with the button Save Results.
- Step 9: Press the button Create Task Templates to convert the results into two Task Templates that can be used for analyzing N. meningitidis next-gen sequencing data: the MLST+ targets are added to the MLST+ Task Template.
The 542 targets that were excluded by the Gene Overlap Filter or that were excluded by the query genomes filter or that were not found in a query genome or that were found more than once in a query genome are added to the Additional targets Task Template. 227 targets were discarded.
Both Task Templates contain initially empty allele libraries.
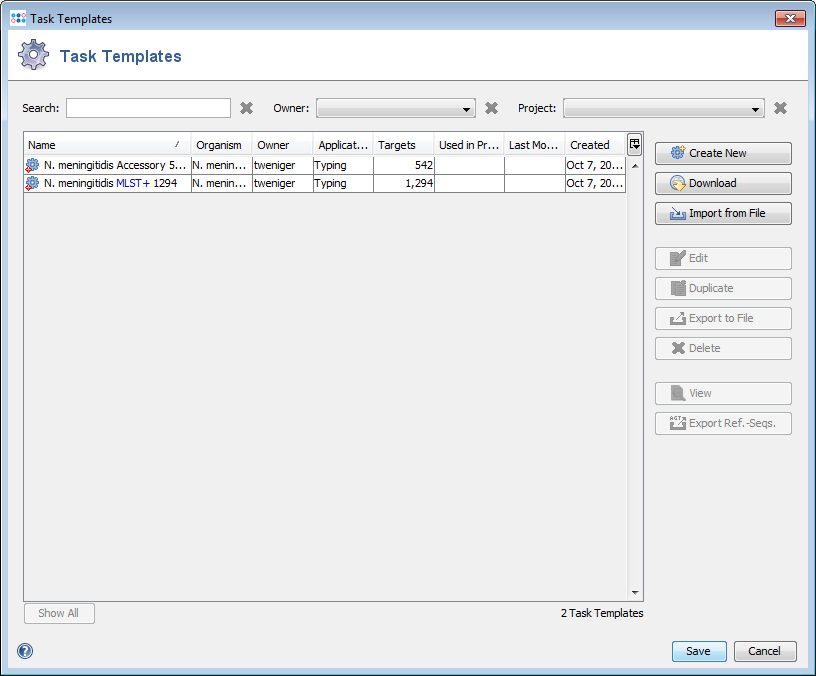
- Step 10: Press Save to store the Task Templates to the server.
- Step 11: The new Task Template can now be added to a Project and can be used to analyze N. meningitidis next-gen sequencing data (see MLST+ tutorial).