
| wiki | search |
Ridom SeqSphere+ can import field data from MS Excel and CSV files. The Excel file must contain a simple data table, where each row holds the values for one Sample. One column of the table must contain the Sample ID. This Sample ID is used to match table rows to Samples, it must be unique for each Sample in a Project.
The mapping from table columns to Sample fields is stored in the Field Import Settings. The mapping is stored by the position in the table.
Use the menu item ![]() File | Import Data to open the import dialog.
File | Import Data to open the import dialog.
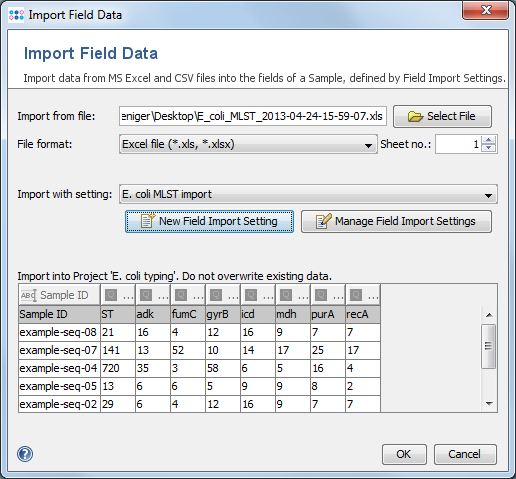
- Select the MS Excel or CSV file for import. For MS Excel files the used sheet can be specified. For a CSV-file, the field delimiter can be provided.
- An existing Field Import Setting can be selected in the Import with setting box. Field Import Settings with a different column count than the selected file cannot be used and are highlighted in red.
- To define a new Field Import Setting, click the
 New Field Import Setting button.
- To edit existing Field Import Settings, use the
 Manage Field Import Settings button.
Creating/Editing a Field Import Setting
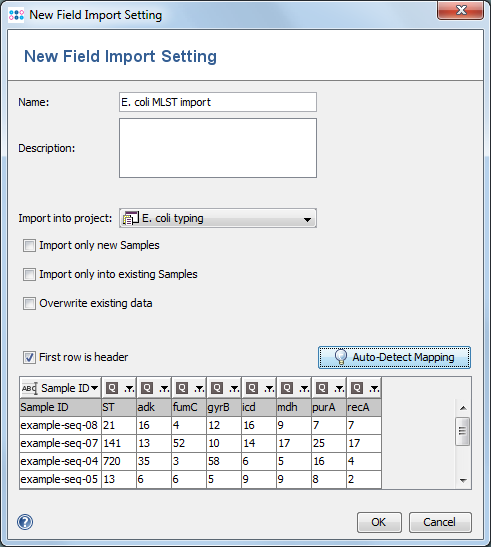
- A name must be entered for the new Field Import Setting.
- A Project must be chosen in which the new data should be imported.
- If the checkbox Import only new Samples is set, then only the data of new Samples that are not found in the project will be imported.
- The checkbox Overwrite existing data defines if fields that are already filled may be overwritten when importing data.
- The checkbox First row is header must be set if the data contains the column titles as first row. In this case, the button Auto-Detect Mapping can be used to guess the appropriate field for each column, by comparing the column titles with the available fields.
- The mapping for the according column can by manually set by clicking on the table header. The Sample ID column must be mapped, because it is used to match the rows to Samples. All other fields are optional. Columns that are not matched to a field yet are highlighted red and will not be used for the import. The popup menu that appears when the table header is clicked contains all fields that are used in the currently selected Project.
Importing dates
When importing dates, make sure the date is in format yyyy-MM-dd or dd.MM.yyyy.