

Contents
Server Software Installation
Minimum System Requirements
- CPU: Core 2
- RAM: 8 GB (2 GB if only working with Sanger Sequencing Data)
- Hard disk: 2 GB available space (depending on expected size of database)
- Operating System:
- Microsoft Windows 7 / Vista / XP
- Linux (tested with Debian 6.0, Ubuntu 10.11, Suse 12.1, Fedora 15)
Installation on Linux
Extract the installer package (tgz) into the directory where you want to install the SeqSphere+ server. Use the executable seqsphereserver32 or seqsphereserver64 to start the application. Ridom SeqSphere+ server will create the profile directory .seqsphere-server in your home directory.
Installation on Microsoft Windows
Start the installer executable and follow the messages of the installation wizard dialog. After the installation procedure is completed. Ridom SeqSphere+ Server can be run by clicking the desktop icon or selecting the entry in the Start Menu.
Server Configuration
Ridom SeqSphere+ server will create a working directory to store the database and configuration files. By default this working directory is located in your home directory (e.g., a path like C:/Users/<username>/seqsphere-server on Windows 7, and /home/<username>/.seqsphere-server on Linux).
The path of this working directory can be changed with the command line parameter -workingdir. An existing configuration file must not be moved to another working directory, because all configured file paths (like the database) are stored absolutely.
The database will be created in the subdirectory data of the working directory. By default, the database backups will be created each day at 00:00 in the subdirectory backups of the working directory. This can be changed by the SeqSphere+ Administrator using the SeqSphere+ client.
By default, the SeqSphere+ server listens at port 8064 for clients. This can be changed with the command line parameter -port.
Server Database Initialization
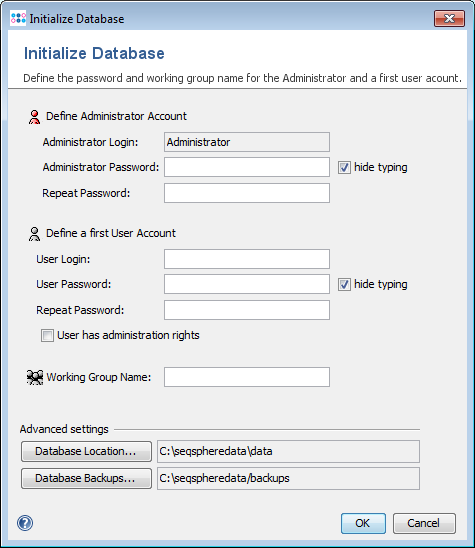
- Start Ridom SeqSphere+ Client.
- If the server was not found automatically, create a new server configuration for the host and port of your SeqSphere+ Server.
- After the configuration has been created and the server was connected successfully, a dialog appears to define the Administrator account on the server. Enter a new password for this account, and enter a name for the user group to which the Administrator should belong.
- After the database initialization has been performed, you can log in as Administrator and create additional users.