Contents
Installing the SeqSphere+ Server
Server Installation on Microsoft Windows
The Ridom SeqSphere+ Server can be installed in two modes:
- as ordinary program that must be started by a user
- as background service that is started when Windows starts and that is running in the background as long as Windows is running, independent of the current Windows user.
If multiple users should be able to access the same server via intra-/internet, the second option (installation as background service) is recommended to ensure that the Server always will be running independent from the logged-in user. If multiple Windows users of the same computer should be able to access the same server, the second option (installation as background service) is required because the installation of the Ridom SeqSphere+ Server as ordinary program for various Windows users of the same computer would require multiple Server activations that are not allowed by the licensing model.
Start the installer executable and follow the messages of the installation wizard dialog. During the installation process it is possible to select if installation as service should be done.
Installation as Windows Service
If installation as service is selected, a working directory must be chosen were the software stores the database, configuration, and logging files (default C:\seqspheredata). It is not recommended to choose a network location for this directory.
A service with the name "seqsphereserver" is installed and automatically started. Therefore, the Ridom SeqSphere+ Server is already running when installation is finished.
![]() Hint: The setup configures the Windows firewall to allow remote access to the SeqSphere server. If another firewall is used make sure that the program seqsphereserver32.exe or seqsphereserver64.exe is allowed to open connections.
Hint: The setup configures the Windows firewall to allow remote access to the SeqSphere server. If another firewall is used make sure that the program seqsphereserver32.exe or seqsphereserver64.exe is allowed to open connections.
![]() Hint: By default the service is started as Local System account. If the service needs to access a network drive (e.g., to store backups) the account must be changed to an ordinary user account. See
Microsoft TechNet for a description how to do this.
Hint: By default the service is started as Local System account. If the service needs to access a network drive (e.g., to store backups) the account must be changed to an ordinary user account. See
Microsoft TechNet for a description how to do this.
![]() Hint: Microsoft .NET framework 2 or above is required for the service installation. On very old Windows versions it may be necessary to install the Microsoft .NET framework manually. If an error message opens during or after the setup that indicates a problem with the .NET Framework, then please contact us.
Hint: Microsoft .NET framework 2 or above is required for the service installation. On very old Windows versions it may be necessary to install the Microsoft .NET framework manually. If an error message opens during or after the setup that indicates a problem with the .NET Framework, then please contact us.
Installation as Application
If not installed as a service, Ridom SeqSphere+ Server can be run by clicking the desktop icon or selecting the entry in the Start Menu. Ridom SeqSphere+ Server will create a working directory located in your home directory (e.g., a path like C:\Documents and Settings\<username>\seqsphere-server on Windows XP or C:\Users\<username>\seqsphere-server on Windows 7 or later), respectively. This directory will contain the database, configuration, and logging files.
![]() Hint: If the server is installed and started as normal application (and not as service) then every Windows user that starts the server will work on an own SeqSphere+ database.
Hint: If the server is installed and started as normal application (and not as service) then every Windows user that starts the server will work on an own SeqSphere+ database.
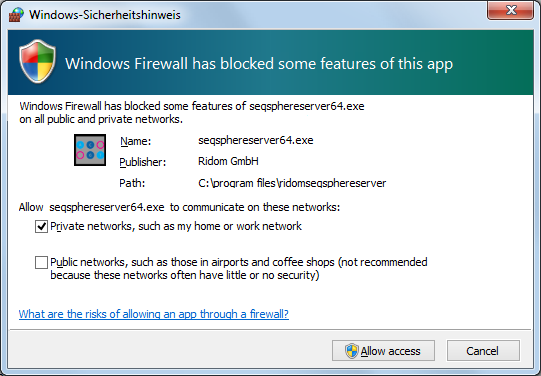
![]() Hint: Note that on the first start of the server, the Windows firewall may show a security warning. Select "Allow access" in the security warning dialog.
Hint: Note that on the first start of the server, the Windows firewall may show a security warning. Select "Allow access" in the security warning dialog.
Server Installation on Linux
Extract the installer package (tgz) into the directory where you want to install the SeqSphere+ server (e.g., with command 'tar xvzf RidomSeqSphereSERVER*'). By default, the server listens on port 8064, therefore this port must be excluded in a firewall. If the SeqSphere+ server should be used by multiple users, an installation as Systemd Service is recommended.
Start with graphical user interface (for single user usage)
Click or start in a terminal the shell script seqsphereserverGUI.sh in the extracted directory RidomSeqSphereServer. The database is by default located in the working directory .seqsphere-server/ of the home directory of the Linux user. So every user who starts the server will get his own database.
Start without graphical user interface (for single user usage)
The run control script rcseqsphereserver.sh can be used to control the SeqSphere+ server:
- ./rcseqsphereserver.sh start' starts the server
- ./rcseqsphereserver.sh status' gives a status info for the running server
- ./rcseqsphereserver.sh stop' stops the server if it is currently running
The rcseqsphereserver.sh script can be called from any other directory and can be used to automatically start the SeqSphere+ server in a system init configuration.
Installation As Systemd Service
The installation package contains the file seqsphereserver.service in the subdirectory /install/systemd. This file can be used to define a systemd service unit for the SeqSphere+ server. The following steps are recommended:
- Step 1: Create a new user
seqsphereserver - Step 2: Extract the installation package into
/home/seqsphereserver - Step 3: Copy the file seqsphereserver.service into
/etc/systemd/system - Step 4: Enable the service with:
sudo systemctl enable seqsphereserver - Step 5: Start the service with:
sudo service seqsphereserver start
Installing the SeqSphere+ Client
Client Installation on Microsoft Windows
Start the installer executable and follow the messages of the installation wizard dialog. After the installation procedure is completed Ridom SeqSphere+ can be run by clicking the desktop icon or selecting the entry in the Start Menu.
Ridom SeqSphere+ will create a profile directory located in your home directory (e.g., a path like C:\Documents and Settings\<username>\seqsphere on Windows XP or C:\Users\<username>\seqsphere on Windows 7 or later) respectively. This directory will contain the configuration and logging files.
Note that on the first start of the server, the Windows firewall may show a security warning. Select "Allow access" in the security warning dialog.
![]() Important: Some SeqSphere+ client features (e.g., SKESA or Mash) are only available on Windows 10 / Windows Server 2019 with installed Windows Subsystem for Linux.
Important: Some SeqSphere+ client features (e.g., SKESA or Mash) are only available on Windows 10 / Windows Server 2019 with installed Windows Subsystem for Linux.
Client Installation on Linux
Extract the installation package (.tgz) into the directory where you want to install SeqSphere+. (e.g., with command 'tar xvzf RidomSeqSphere*'). Change into directory RidomSeqSphere and execute seqsphere32 or seqsphere64 to start the application.
To use the automatic online update function the seqsphere process must have write permission for the installation directory.
The first time you start Ridom SeqSphere+, the software will create the profile directory .seqsphere in your home directory. This directory is used for the configuration files, logging files and pipeline scripts.
![]() Hint: The 64-bit Linux version of Ridom SeqSphere+ client requires glibc 2.11 or later (e.g., Ubuntu 10, RHEL/CentOS 6, SLED 11).
Hint: The 64-bit Linux version of Ridom SeqSphere+ client requires glibc 2.11 or later (e.g., Ubuntu 10, RHEL/CentOS 6, SLED 11).
On rpm bases systems (Suse, RedHat) please try: rpm -q glibc or
on debian based systems (Debian, Ubuntu) please try: dpkg -l libc6
to find out your glibc version.
Connecting and Initializing the Server
- Step 1: Start SeqSphere+ server and wait until the server has started up.
- Step 2: Start SeqSphere+ client.
- Step 3: If SeqSphere+ server is not yet defined on your computer, the following startup dialog opens.
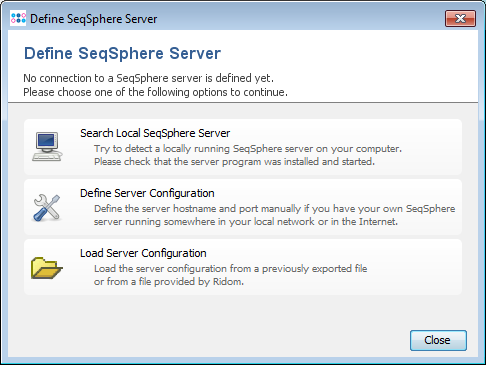
- Step 4: If your SeqSphere+ server runs on the same computer, choose the first option Search Local SeqSphere+ Server, and confirm the found server with the button Use this Server.
- If your server runs on a different computer choose Define Server Configuration, enter the Server Host name or IP address (port can be left empty to use the default port) and confirm with OK.
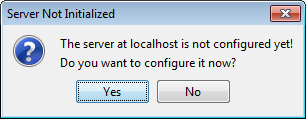
- Step 5: If the server database has not been initialized before, a question dialog opens. Confirm with Yes.
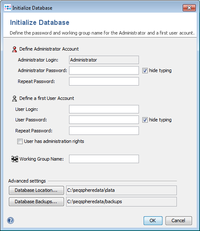
- Step 6: A dialog opens to define the Administrator account and a first user account. The Administrator is only meant for administrative usage. This account cannot be used to create new genotyping data. Therefore in addition a user account needs to be established too. For small (single user) installations, it is convenient to grant administrative rights to this user, too. Finally a name for the first user group must be entered. This group initially contains the Administrator and the first user.
- Below the account section the paths for the database, the storage of uploaded assembly files, and the created backups can be defined. By default they are all stored in the server profile directory

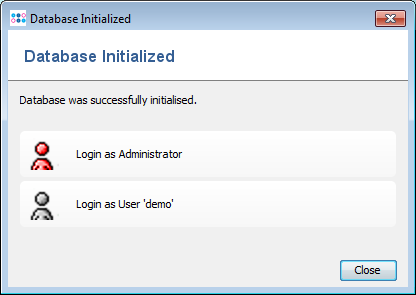
- Step 7: After the accounts are created a dialog opens to directly login as Administrator or as the defined user account. Further logins will require the entered password of course.
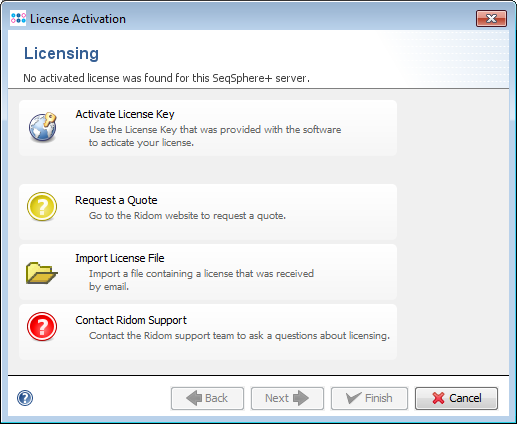
- Step 8: The SeqSphere+ server requires a software license, otherwise it runs in a read-only mode. If no license is found, a dialog window opens to activate your license with a key that was delivered with the software, or to request a new license key from the Ridom website. The activation of the license requires an Internet connection. If the connection fails, please check the proxy settings.