| wiki | search |
Contents |
Installing the SeqSphere+ Server
Server Installation on Linux
Extract the installer package (tgz) into the directory where you want to install the SeqSphere+ server. Open port 8064 in the firewall. Use the executable seqsphereserver32 or seqsphereserver64 to start the application (see command line parameters).
To use the automatic online update function the seqsphere process must have write permission for the installation directory. Internet connection is not required.
Ridom SeqSphere+ server will create the profile directory .seqsphere-server in your home directory. This directory will contain the database, configuration, and logging files.
Server Installation on Microsoft Windows
The Ridom SeqSphere+ Server can be installed in two modes:
- as normal program that must be started by a user
- as background service that is started when windows starts and that is running in the background as long as windows is running, independent of the current Windows user.
If multiple users should be able to access the same server, the second option (installation as background service) is recommended.
Start the installer executable and follow the messages of the installation wizard dialog. During the installation process it is possible to select if installation as service should be done.
Installation as service
If installation as service is selected, a directory must be chosen were the software stores the database, configuration, and logging files. It is not recommended to choose a network location for this directory. If installed as a service, the Ridom SeqSphere+ Server is already running when installation is finished.
Note: Installation as background service requires the Microsoft .NET Framework version 4. This software is usually installed on modern versions of Windows. If an error message opens during setup and indicates that the .NET Framework has to be installed, please cancel the setup, download the .NET Framework, install it, and then re-install Ridom SeqSphere Server. The Microsoft .NET Framework version 4 is available here: http://www.microsoft.com/de-de/download/details.aspx?id=17851
Also Note: The setup configures the Windows firewall to allow remote access to the SeqSphere server. If another firewall is used make sure that the program seqsphereserver32.exe or seqsphereserver64.exe is allowed to open connections.
Installation as program
If not installed as a service, Ridom SeqSphere+ Server can be run by clicking the desktop icon or selecting the entry in the Start Menu. Ridom SeqSphere+ Server will create a profile directory located in your home directory (e.g., a path like C:\Documents and Settings\<username>\seqsphere-server on Windows XP or C:\Users\<username>\seqsphere-server on Windows 7 respectively). This directory will contain the database, configuration, and logging files.
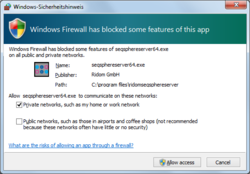
Note that on the first start of the server, the Windows firewall may show a security warning. Select "Allow access" in the security warning dialog.
Installing the SeqSphere+ Client
Client Installation on Microsoft Windows
Start the installer executable and follow the messages of the installation wizard dialog. After the installation procedure is completed Ridom SeqSphere+ can be run by clicking the desktop icon or selecting the entry in the Start Menu.
Ridom SeqSphere+ will create a profile directory located in your home directory (e.g., a path like C:\Documents and Settings\<username>\seqsphere on Windows XP or C:\Users\<username>\seqsphere on Windows 7 respectively). This directory will contain the configuration and logging files.
Note that on the first start of the server, the Windows firewall may show a security warning. Select "Allow access" in the security warning dialog.
Client Installation on Linux
Extract the installation package (.tgz) into the directory where you want to install SeqSphere+. Use the executable seqsphere32 or seqsphere64 to start the application.
To use the automatic online update function the seqsphere process must have write permission for the installation directory.
Ridom SeqSphere+ will create the profile directory .seqsphere in your home directory. This directory will contain the configuration and logging files.
Important for 64bit Systems: Currently there is no Linux 64bit version of the SeqSphere+ client available. However, you can run the 32bit version on a 64bit Linux. This may require that you install packages for 32bit support.
(e.g., libXext6-32bit, libXrender1-32bit, libXst6-32bit, libXi6-32bit on openSUSE 13.1)
Connecting and Initializing the Server
- Step 1: Start SeqSphere+ server and wait until the server has started up
- Step 2: Start SeqSphere+ client.
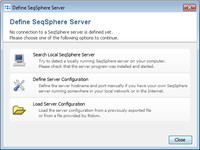
- Step 3: If SeqSphere+ is not configured on your computer yet, the startup dialog opens:
- Step 4: If your SeqSphere+ server runs on the same computer, choose the first option Search Local SeqSphere+ Server, and confirm the found server with the button Use this Server.
- If your server runs on a different computer choose Define Server Configuration, the Server Host name or IP address (port can be left empty to use the default port) and confirm with OK.
- Step 5: If the server database has not been initialized before, a question dialog opens. Confirm with Yes.
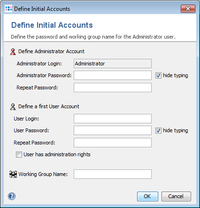
- Step 6: A dialog opens to define the Administrator account and a first user account. The Administrator is only meant for administrative usage. The account cannot be used to create new data. Therefore a user account is created. For small (single user) installations, it is convenient to grant administrative rights to this user, too. Finally a name for the first user group must be entered. This group initially contains the Administrator and the first user.
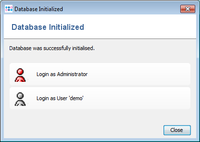
- Step 7: After the accounts are created a dialog opens to directly login as Administrator or as the defined user account. Further logins will require the entered password of course.
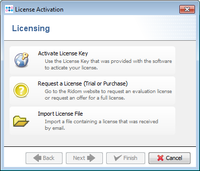
- Step 8: The SeqSphere+ server requires a software license, otherwise it runs in a read-only mode. If no license is found, a dialog window opens to activate your license key that was delivered with the software, or to request a new license key from the Ridom website.

