

Creating a New Project
Select in the menu File | New | Project to open the New Project dialog window.
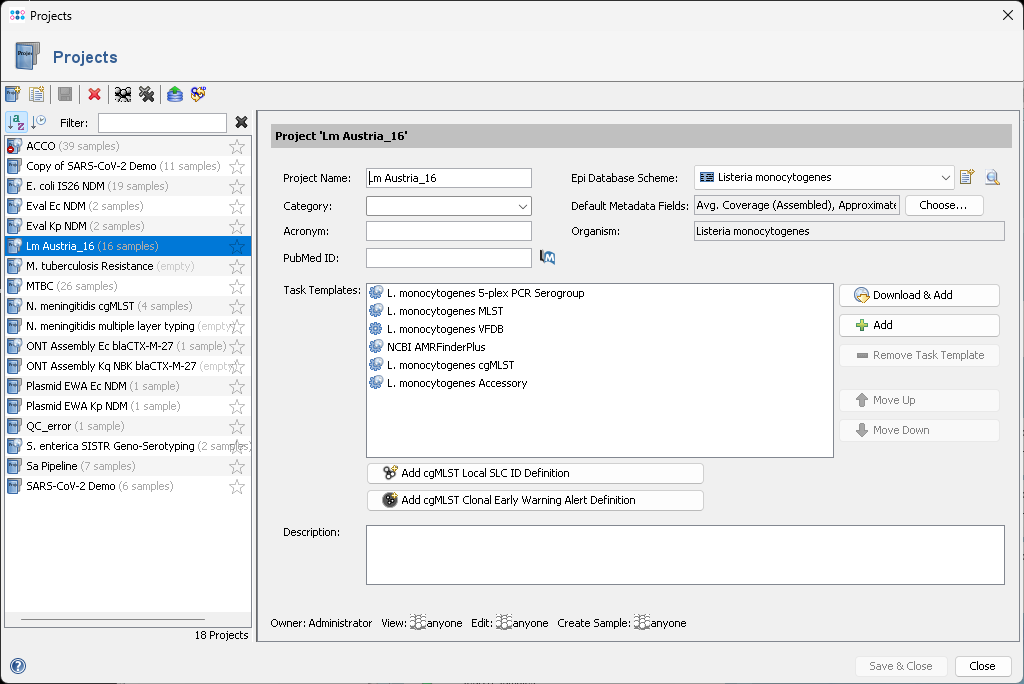
In the upper left of the dialog window the mandatory field Project Name must be filled to set a name for the new project. The field Category can be used to categorize different types of projects. The field Acronym can be used for automatic assigning Samples in pipelines to various projects according to the acronym part of the file names. The Pubmed ID field can be used to add a reference to this project.
On the right, the Epi Database Scheme must be chosen for each Project. By default the Default Bacteria scheme is selected. The Epi Database Scheme defines the database fields that are present for each Sample. The field Default Metadata Fields below defines the default epidemiological and procedure metadata fields (including user defined fields) that will be used if comparison tables, clonal and plasmid early warning alerts and search similar samples and plasmid search results are created. The not editable field Organism shows the genus and species of this project with a tooltip from which task template(s) the species information was derived.
Further below the Task Templates can be selected for the Project.
Task Templates define the sequence data processing tasks for each Sample of this project. They can be added from the Task Template Sphere by using the button ![]() Download & Add or from the list of Task Templates that are already present in the local database by using the button
Download & Add or from the list of Task Templates that are already present in the local database by using the button ![]() Add.
Add.
If a cgMLST Task Template was added to the Project, Local Single Linkage Clustering IDs and clonal Early Warning Alerts can be created and managed with two button below the task templates section.
At the bottom of the panel the Access Control can be defined for the Project. Furthermore, the defaults for Samples and Task Entries of this Project can be defined here. If the default for Samples is changed later, all Access Control settings of existing Samples can be updated if this is wanted. This is done in a background job on the server.
Managing Projects
Invoke Options | Projects in the menu to see a list of all Projects on the server (that are visible for you). Choose a Project on the left list to modify it.
Press the ![]() Save button to confirm the changes.
Save button to confirm the changes.
The ![]() button allows to delete the currently selected Project and the
button allows to delete the currently selected Project and the ![]() button allows to delete multiple Projects at at once. Note that deleting Projects also deletes all Samples of this project, and that the deletion cannot be undone.
The
button allows to delete multiple Projects at at once. Note that deleting Projects also deletes all Samples of this project, and that the deletion cannot be undone.
The ![]() button allows to adjust the access control for multiple projects at once.
button allows to adjust the access control for multiple projects at once.
The button ![]() allows to perform for the selected project a local SLC ID assignment for existing samples.
allows to perform for the selected project a local SLC ID assignment for existing samples.
Projects can be defined as favorites by clicking on the star icon ![]() at the right side of the list. Projects that are marked as favorite (
at the right side of the list. Projects that are marked as favorite (![]() ) are always on the top of each project selection field.
) are always on the top of each project selection field.
FOR RESEARCH USE ONLY. NOT FOR USE IN CLINICAL DIAGNOSTIC PROCEDURES.