

The workflow of a pipeline is defined by a pipeline script. Pipeline scripts are always stored on the computer in the profile directory of the user where the SeqSphere+ Client is installed that was used to define a script. To share a script on multiple Client computers the script can be either ex- and imported or distributed via pipeline reports. A pipeline script can be easily created using the wizard dialog which has the following six sections.
Contents
User Account
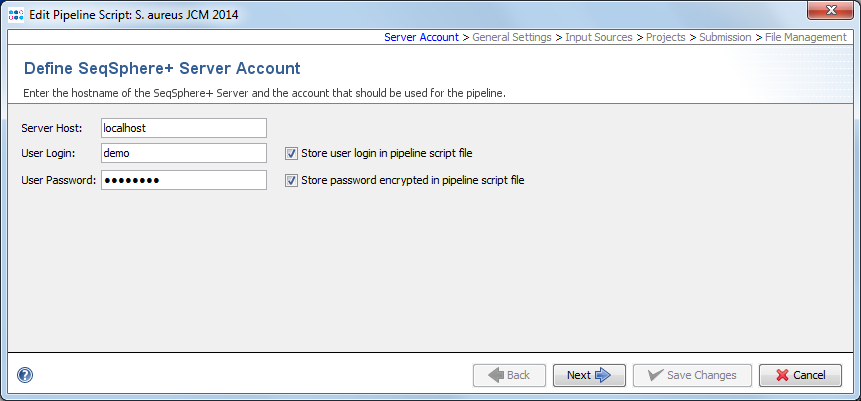
To setup a pipeline script a user account on a specific server is required. By default, the User Login but not the User Password will be stored in a pipeline script. Thereby the script can only be edited and run when the Password of this user is entered. This means the pipeline will be run on behalf of this user, and all Samples created by such a defined pipeline script will be owned by this user.
If the User Login is not stored in the script, a login dialog is shown when starting the pipeline and the pipeline runs with the supplied login information.
Next to the User Login also the User Password of the user can be stored in a pipeline script. The password is always stored encrypted. Every user can run such a script. Export such a script to share it between different users. However, for editing a script always the User Password is required.
![]() Warning: If User Login and User Password are stored in the pipeline script, then anyone who has access to the computer account can run a pipeline without further authentication!
Warning: If User Login and User Password are stored in the pipeline script, then anyone who has access to the computer account can run a pipeline without further authentication!
General Settings
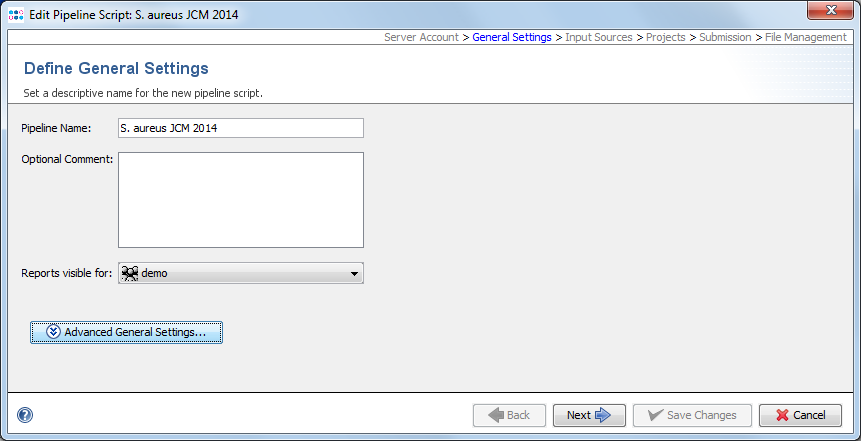
The section defines general settings of the pipeline. Each pipeline must have a unique name. Optionally a comment can be entered. In addition the access rights for the reports of the pipeline can be specified here (default is primary group).
By pressing the Advanced General Settings button more detailed general setting options can be selected:
- Bad Quality Tag
- This can be used to define a name for a tag that is automatically assigned to a Sample, if the percentage of good cgMLST targets is below the given value. If no cgMLST Task Template is used, this parameter has no effect. A tag helps to search for specific Samples (e.g., all bad quality tag Samples since yesterday) more efficiently in the database.
- Assembler Timeout
- This can be used to terminate an assembling/mapping processes if it takes too long.
- Continuous Mode
- This can be used to define a pipeline that waits for new files in a specific directory. When started, the pipeline processes all existing files found in the input sources. After the files are processed, the pipeline waits until new files appear in the input source(s) and then starts again processing the new files.
- Import read data for all targets
- This can be used to define that the read data should be kept for all targets. By default they are only kept for targets with QC errors or warnings.
- Repeater Tag(s)
- This feature can be used to handle repeated runs in an automatic manner. The tag name that is defined here must be a part with delimiters of the FASTQ file names that are created during the repeated run. The position of the tag in the file name must be stated in the Sample Tag of the File Naming definition section of the script. If multiple repeated runs are done, a list of comma separated tag names can be entered here. Please see the FAQ for more details.
Input Sources
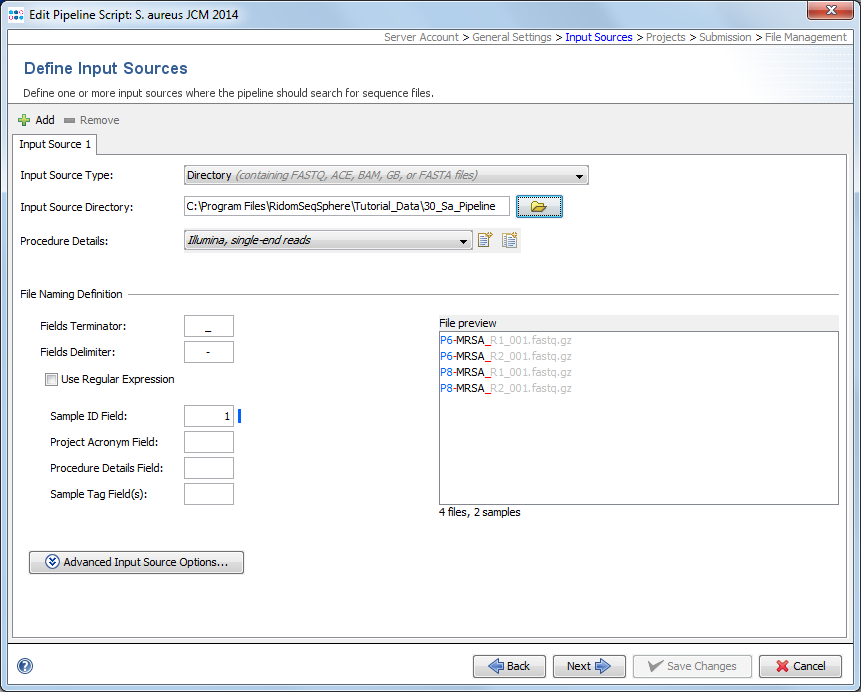
An input source defines where the pipeline should look for sequencing data (FASTQ/ACE/BAM/GB/FASTA files). FastQ files with adapters (& multiplex indices) trimmed-off are required here for optimal de novo assembly results. Multiple input sources can be defined here for differing sequencing machine vendors (e.g. Illumina or Ion Torrent) by pushing the + Add button in the upper-left corner.
The Input Source Type
- a directory, or
- a directory including all subdirectories, or
- the hard disc of the Illumina sequencer or the run folders copied to a network drive.
The Input Source Directory must always define a path to the sequencing data.
The sequencing vendor (e.g., Illumina or Ion Torrent, etc.) and sequencing protocol (e.g., single-end or paired-end reads) of the Procedure Details must be defined always if FASTQ files will be assembled and no other laboratory procedure details are available (e.g., by file naming procedure details or by SPEC files). All other procedure details are optional. However, if it is intended to submit FASTQ files to ENA then please remember that some laboratory procedure details are obligatory required by ENA. If assembled data is processed with the pipeline (ACE/BAM/GB/FASTA files) then procedure details are always optionally. In general this feature is very convenient way to attach detailed - frequently identical - laboratory procedure details for documentation purposes to a large number of Samples.
File Naming
Each input source must have a sequence data file naming convention defined, that enables an automatized workflow with no user intervention required. Minimum the Sample ID information must be transferred by the sequence data file name. However, additional information (in file name fields) can be transferred via the file name to further streamline this automized analysis. Usually the file names of sequence data can be controlled to a certain amount by supplying a filled-in sample sheet (e.g., by using the Illumina Experiment Manager tool) to a sequencing machine before starting a run.
First, the file name can be split into different fields by a Field Delimiter until a defined Field Terminator appears. If no terminator is defined, the whole file name (without file extension) is used. Alternatively a regular expression can be used here to split a file name into various fields. Once this option is chosen and a regular expression is entered the delimiter and terminator entered above are ignored.
Next the Field Positions in File Name of the various fields can be defined here, by entering a number (beginning with 1) into
- Sample ID
- Defines the position of the Sample ID field in the file name (only required information). If in the pipeline project no Sample with this ID exists then the pipeline creates a new Sample entry with this ID and attaches the genotyping results from the sequence data to this entry. If a Sample with this ID and with associated epi metadata but no genotyping results already exists in the pipeline project then the pipeline attaches the genotyping results from the sequence data to this entry. If a Sample with this ID and associated genotyping results for the foreseen Task Templates already exists in the pipeline project then the Sample is not processed at all. A repeater tag can be used to process this Sample nevertheless and to overwrite existing genotyping results.
- Project Acronym
- Defines the position of the project acronym field in the file name. This field can be left empty if Samples from only one project are going to be processed. If this feature is used in sequence data files and defined here then the data will be processed as defined in the project(s) that is referred to by the acronym(s). Please remember that all project(s) need to be referred to in addition in the following Projects section of the script.
- Procedure Details Name
- Defines the position of the procedure details name field in the file name (can be left empty). If this feature is used in sequence data files and defined here then the associated Sample entries get the Procedure Details field values entered of the object that is referred to by the name. If this option is used it overwrites where applicable also supplied SPEC file information and always the procedure details stated above in this section.
- Sample Tag(s)
- Defines the position(s) of one or more tag(s) fields in the file name (can be left empty). Multiple tag positions can be separated with commas here. If this feature is used in sequence data files and defined here then the associated Sample entries get the tag(s) attached to them. Next those tag(s) can be used to search for Samples more specifically in the database. The position(s) of repeater tag(s) fields in the file name need also to be defined here.
The coloring of the sequence data files in the File preview box documents how current delimiter, terminator, and field settings apply to those file.
![]() Hint: Illumina uses the '_' as a separator in file names. Therefore, it cannot be used as field delimiter for the file naming. We recommend to use '-' as field delimiter and '_' as field terminator for Illumina FASTQ files.
Hint: Illumina uses the '_' as a separator in file names. Therefore, it cannot be used as field delimiter for the file naming. We recommend to use '-' as field delimiter and '_' as field terminator for Illumina FASTQ files.
Advanced Input Source Options
- Append to Sample IDs
- In some case it might be useful to append some static text to the IDs of all Samples that are imported from this input source (e.g., "_pipelinetest", or "_%t" to add a timestamp).
- Default Project Acronym
- If a project acronym field is not used in all sequence file names, a default value can be entered here, that will be used for Samples with no associated project information that are imported from this input source.
- Assign Tag(s)
- If no tag information is transferred by (all) sequence data file names it might be in some cases useful to assign tag(s) to all Samples that are imported from this input source. Multiple tags can be attached for which the names must be entered separated by comma here.
Projects
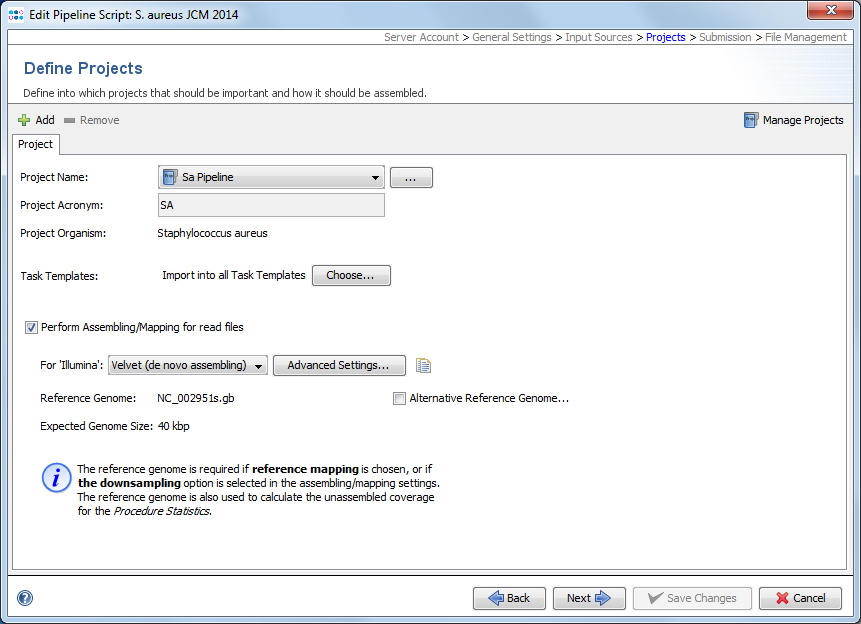
In the project section it is defined into what projects Sample data will be imported. At least one project must be defined here even if a project acronym is used in the file names and its position is defined in the previous section. If more than one Project is defined here, each Project must have an acronym that is used in the file names and their position defined in the previous section. In this case the project for each Sample is selected by the acronym that is found in the file name of the input data.
The Projects in Database button in the upper-right corner of this section can be used to modify existing projects (e.g., adding a project acronym) or to create new projects. By pushing the + Add or - Remove buttons in the upper-left corner the projects to be used by the pipeline script can be managed.
Per project tab the following information needs to be selected or is shown:
- Project Name
- Via a drop-down list a project can be chosen. By pushing the ... button the project list can be filtered.
- Project Acronym
- Shows the project acronym (if defined at all) for the chosen project.
- Project Organism
- Shows the project organism as entered in the Task Template(s) for the chosen project.
- Task Templates
- By default all Task Templates of a selected project are chosen by a pipeline script. By pushing the Choose... button next to Task Templates this can be limited to selected Task Templates.
The checkbox Perform Assembling/Mapping for read files can also be checked and configured per project. Once selected a pipeline using this script will assemble FASTQ files (checkbox obviously does not apply for ACE/BAM/GB/FASTa files). For each sequencing vendor (defined in the input sources section via multiple input sources and/or by using a procedure details field in the FASTQ file names) an assembler or mapper can be selected. The following assemblers/mappers are available:
- Velvet de novo assembler (recommended only for Illumina data; only available for MS Windows)
- SPAdes de novo assembler (only available for Linux)
- BWA reference mapper (available for MS Windows and Linux)
Right to the assemblers/mappers drop-down selection list, an Advanced Settings button can be used to specify the preprocessing (trimming, downsampling) and assembler/mapper parameters. Downsampling is selected here by default for Velvet, SPAdes, and bwa. Trimming is only turned on by default for Velvet and can again be modified in the Advanced Settings.
The project Reference Genome and Expected Genome Size are shown below the selected assembler/mapper. A reference genome is required if reference mapping (BWA) is chosen, or if the downsampling option is selected in the Advanced Settings. The reference genome is also used to calculate the unassembled coverage for the Procedure Statistics. If the Project contains a cgMLST Task Template then the reference genome is automatically taken from the Task Template (if multiple cgMLST Task Templates should be present in a single project then the reference genome of the Task Template first in ordering is taken). The reference genome can also be set manually by using the Alternative Reference Genome button. In the case that no cgMLST Task Template is present in the project then this button must always be used to define a reference genome.
Submission
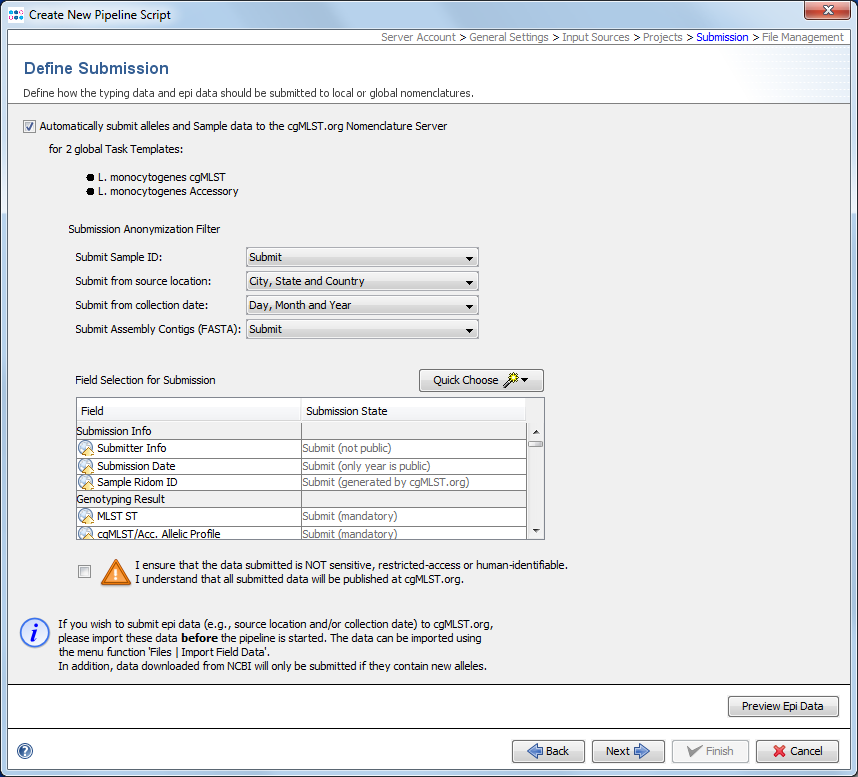
For local Task Templates the default setting is to automatically assign new types (if this option is enabled in the Task Template).
For public cgMLST Task Templates an automatic submission to cgMLST.org can be enabled here. If this option is enabled, the Submission Anonymization Filter for the pipeline script is shown and can be adjusted to control which data fields and level of details should be submitted to cgMLST.org. In addition, then the checkbox (declaration that data is not sensitive, etc.) shown below needs to be checked.
In contrast to the manual submission, the pipeline cgMLST.org submission process does not show a preview dialog of metadata to be submitted before the samples are submitted, because pipelines run in an automatized and unattended mode. The button Preview Epi Data at the bottom of this section can only be used to show some of the potentially submitted metadata. Only epidemiological metadata (no other metadata are available at the time of setting up a pipeline script) of sequence file data located in the input source directory (script might be configured to run in continuous mode) that have already epidemiological data stored in the SeqSphere+ server database can be previewed when the script is setup.
Submission of samples via a pipeline requires that the user account of the pipeline is already registered at the cgMLST.org Nomenclature Server. If the user account is not registered, an error message dialog is shown when confirming the Submission section by pressing the Next button . This registration can be done if necessary, by pressing the according button shown in the error message dialog or by using the command Options | User Settings in the main menu of SeqSphere+ when run in interactive mode.
![]() Important: If is intended to submit epi data to the cgMLST.org nomenclature server using a pipeline, then the Samples with entered epi data must already exist in the database before the pipeline is started (e.g., by importing them from an Excel file first).
Important: If is intended to submit epi data to the cgMLST.org nomenclature server using a pipeline, then the Samples with entered epi data must already exist in the database before the pipeline is started (e.g., by importing them from an Excel file first).
File Management
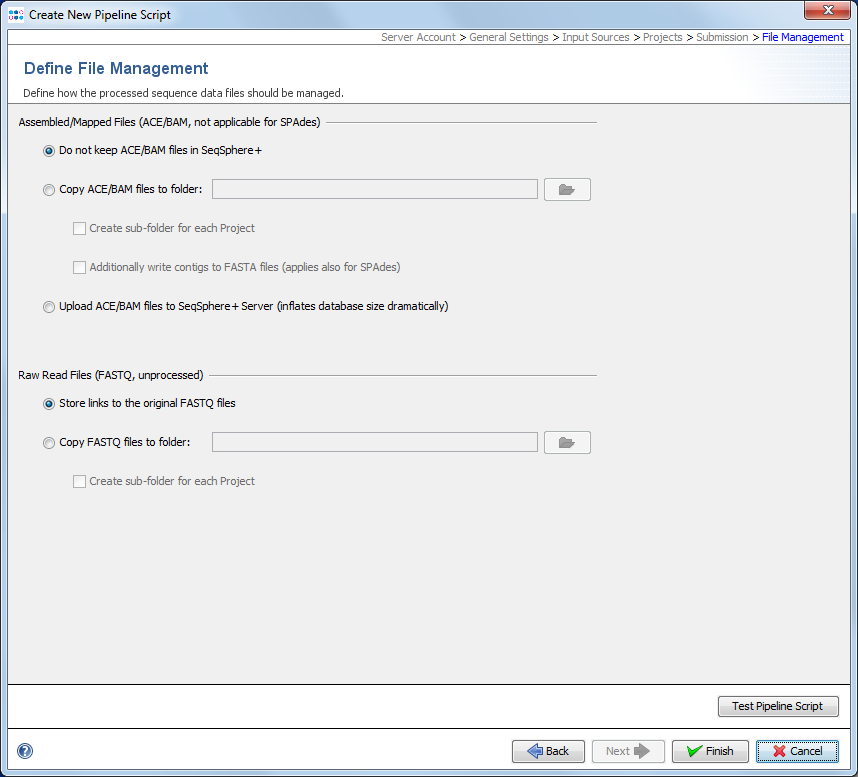
In this last section it can be defined how the pipeline process should manage the assembled/mapped files (ACE/BAM) and the read files (FASTQ). All files are referenced in the process tab of a Sample (see more details).
The are three options how to handle Assembled/Mapped Files (ACE/BAM):
- Do not keep ACE/BAM files in SeqSphere+
- This is the default and stores with the Sample only a link to the ACE/BAM file. If the file path of the link is referring to a local disk of a specific computer that has the SeqSphere+ client installed, than the link is only working when used by a SeqSphere+ client from exactly this computer. Furthermore, if this option is used in a pipeline that performs assembling/mapping with ACE/BAM result files (processing of FASTQs with Velvet or BWA; not SPAdes) then those files will not be kept permanently and the links to them will be broken.
- Copy ACE/BAM files to folder
- If this option is chosen, ACE/BAM files are copied to the selected directory. The Sample entry stores only a link to this copied file. Subdirectories named by the project acronym (if available) with the according ACE/BAM files can be created automatically when the Create sub-folder for each Project option is chosen. When the option Additionally write contigs to FASTA files (applies also for SPAdes) is chosen then next to the ACE/BAM files the FASTA assembly contigs files are also exported into the according (sub)folder.
- Upload files to SeqSphere+ Server
- If this option is used, the assembled/mapped files are uploaded to and stored at the SeqSphere+ Server. The uploaded file is automatically deleted when the attachment is removed in the process tab of the Sample or if the whole Sample is deleted. Using this option will dramatically increase the databases size. Therefore, it is not recommended to use this option permanently in pipelines.
The very large Raw Read Files (FASTQ) cannot be uploaded to the SeqSphere+ Server. By default the option Store links to the original FASTQ files is turned on that stores the path to FASTQ(s) in the procedure tab of the Sample entry. However, again there is an option to Copy FASTQ files to folder that copies the files to a selected folder. The Sample entry stores only a link to this copied file. Subdirectories named by the project acronym (if available) with the according FASTQ files can be created automatically when the Create sub-folder for each Project option is chosen.