

Contents
Menu Bar
The Menu on the top of the window has the following sections:
- File: Open files, and create, search, import/export database entities
- Options: Management of master data and preferences
- Administration: System management tools (only shown for administrator users)
- Tools: Further analysis tools
- Navigation: Navigation functions and navigation history
- Bookmarks: Bookmark functions and list of created bookmarks
- Help: Update and support functions
The navigation toolbar is the topmost toolbar in the upper right corner of the window.
-
 Navigate to the Project Overview Table for the current entity
-
 Navigate to the Sample Overview of the current entity
-
 Navigate to the Task Entry Overview of the current entity
-
 Navigate to the Target Overview of the current entity
-
 Navigate to the Welcome Page
-
 Navigate back to the last shown entity
-
 Navigate back to next entity on the same level in the Loaded Sample Tree. Use the drop-down button to filter by analysis state.
-
 Navigate back to previous entity on the same level in the Loaded Sample Tree. Use the drop-down button to filter by analysis state.
-
 Set or remove a bookmark for the current entity. The bookmarks are shown in the Bookmarks menu section and on the Welcome Page. The list of bookmarks is stored locally on your computer.
-
 Enter or leave the edit mode
-
 Refresh the access mode of the current entity
-
 Save the Sample of the current entity to the database
-
 Close the Sample of the current entity
The Sample (![]() ) is the primary data object in SeqSphere+.
) is the primary data object in SeqSphere+.
Each Sample belongs to one Project (![]() ):
):
- Each Project has one Database Scheme that specifies the Sample's database fields (e.g. sample ID, isolation date, etc.).
- Each Project has Task Templates that specify the Sample's DNA sequencing tasks (e.g. MLST).
Each Sample can have Task Entries (![]() ) that are specified by the Task Templates of its Project:
) that are specified by the Task Templates of its Project:
- Each Task Entry is meant for a specific DNA sequencing task that is performed for this Sample.
- Each Task Entry is specified by a Task Template that is available in the Sample's Project.
- Each Task Entry can have targets (
 ) that are specified in the Task Template.
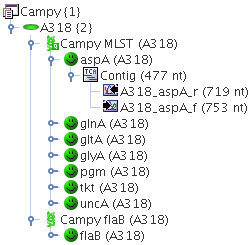
Example: A Project Campy, contains two Task Templates: Campy MLST, that contains the 7 MLST loci as targets, and Campy flaB that contains only a single target. Each Sample of this Project may now contain one Task Entry for Campy MLST, that contains up to 7 different targets, and one Task Entry for Campy flaB, that may contain only one target.
The navigation tree in the left part of the main window shows all loaded Samples. These may be newly created Samples, or Samples that are retrieved from the database.
The Samples are sorted by Project, and are shown in the subtree right below their Project. If the Sample contains Task Entries, they are displayed in the subtree below the Sample. Each Task Entry may have one or more targets that are shown in the hierarchy below the Task Entry. Finally, down in the hierarchy the contig(s) and read(s) of each target are shown.
The colors of the icons apply to the target analysis result, or to the summarized result for all targets in a Task Entry or Sample. Double-clicking a data object in the tree opens an editor in the editing panel right of the navigation tree. The currently opened data object is highlighted in the tree.
Clicking a data object with the right mouse button shows a menu with context-sensitive commands. Clicking data objects while holding the SHIFT- or CTRL-key allows more than one data object to be selected and by clicking with the right mouse button a command for all selected objects can be chosen.
Above the tree a toolbar is shown:
-
 Search Samples in database
-
 Sort Samples by sample id, query result of the task entry, or target analysis state.
-
 Expand the tree to a specific level. The tree path to the currently opened data object is always expanded. Set Auto-Collapse Unused Items to collapse all the path to objects but the currently opened one.
Editing Panel
Shows the details for the currently selected item (Project, Sample, Task Entry, Target, Contig) and allows editing if the item is writable and was opened in editing mode.
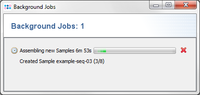
Background Jobs
![]()
The progress of running background jobs are shown on the lower right side of the main window. Click on the progress bar to get a complete list of running jobs. Background jobs can be cancelled using the button ![]() Terminate Task.
Terminate Task.
Viewing, Editing, and Locking Samples
A Sample that is loaded in the Workspace is by default opened in Editing Mode (if the user has permissions to edit the Sample).
In the Editing Mode the data of the Sample or its Task Entries can be modified and the Sample is currently locked from opening in this mode for all other users. This means that other users can still open these Samples, but only in Viewing Mode, even if they have permissions to edit the Sample. When the Samples are locked they will be unable to make any changes, including importing data for this Sample. Other users will see an icon next to the Sample which explains that it is currently locked.
In the Viewing Mode the data of the Samples and its Task Entries can only be viewed or exported, but not modified.

An opened Sample can be toggled between Viewing Mode and Editing Mode with the ![]() Enter/Leave Editing Mode button in the toolbar above the Editing Panel.
The
Enter/Leave Editing Mode button in the toolbar above the Editing Panel.
The ![]() Refresh button can be used to reload a Sample that is in Viewing Mode.
If a Sample has unsaved changes, the Editing Mode cannot be released until the Sample is saved.
Refresh button can be used to reload a Sample that is in Viewing Mode.
If a Sample has unsaved changes, the Editing Mode cannot be released until the Sample is saved.
By default, Samples are opened in Editing Mode. This behavior can be changed with menu item Options | Editing Mode Defaults.
If a login session is inactive (no input from mouse or keyboard) for more than ten minutes, then all unmodified Samples that are currently in Editing Mode are switched to Viewing Mode. If a login session is inactive for more than ten three hours and no modified data exists, then the user is automatically logged out.